It has been a while since the System Center 2012 Configuration Manager RC 2 released. If not mistaken should be around middle of January. However, it is still not too late to try on it.
I has been tried it out on my test lab and would like to share it out. In my test lab, there will be two virtual machines, one is Site Database with SQL 2008 SP2 CU7 and another is the main program of SCCM 2012.
In first part of the blog, I will focus on the installation of the SQL 2008 SP2 CU7.
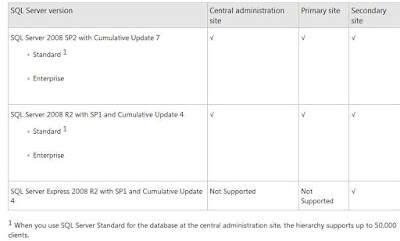
First of all, take note on the official supported configuration of SQL Server version & edition for System Center 2012 Configuration Manager. You may refer to http://technet.microsoft.com/en-us/library/gg682077.aspx#BKMK_SupConfigSQLSrvReq under the section “Configurations for the SQL Server Site Database”.
STEP 1: Install Windows Component
To install the SQL 2008, it is requiring adding the Windows component à .NET Framework 3.5 first.
Open up the Server Manager à Add Feature
Select .NET Framework 3.5.1. Features
At the Add Features Wizard, click on Add Required Role Services
On the Web Server (IIS) roles, let the Roles Services as default
Application Development
.NET Extensibility
Security
Request Filtering
.NET Extensibility
Security
Request Filtering
Installation successful
STEP 2: Start SQL 2008 System Configuration Checker
Run the System Configuration Checker to view the status of pre-requisites before the SQL server installation
STEP 3: Launch the SQL 2008 Installation Wizard
Make sure all the Setup Support Rules is passed. If the Windows Firewall is on, make sure the exception is configured for the incoming and outgoing traffic for SQL.
Choose as Default instance
Set the SQL Services startup configuration. I’ve chose to start using Local System account and the automatic startup type for SQL Server Agent, SQL Server Database Engine and SQL Server Reporting Services
Set the collation for Database Engine as SQL_Latin1_General_CP1_CI_AS
Use Windows authentication mode and configure your desire user account or user group as the SQL server administrator
Configure the SQL Reporting Services with the default configuration = Install the native mode default configuration
Make sure all the installation rules passed. Troubleshoot if there is any error or warning
Installation started
Installation succeeded with no error
STEP 4: Upgrade the SQL 2008 to Service Pack 2
Run the SQL 2008 Service Pack 2 installer and update the SQL server
STEP 5: Upgrade the SQL 2008 SP2 with Cumulative Updates 7
Run the CU7 installer and update SQL server
STEP 6: Configure the Network Protocols for MSSQLSERVER
To enable the TCP/IP protocols for the SQL server, navigate to Start à All Programs à SQL Server 2008 à Configuration Tools à SQL Server Configuration Manager à SQL Server Network Configuration à Protocols for MSSQLSERVER à TCP /IP
Restart the MSSQLSERVER service to let changes take effect.
STEP 7: Configure pre-requisite to ease SCCM 2012 installation
1. Grant SCCM2012 Computer Account as the Local Administrator for Site Database Server
2. Turn off the User Access Control (UAC) setting in Windows
STEP 8: Finished


No comments:
Post a Comment